
XF users working with either local high-performance computing (HPC) environments or access to Amazon web services must configure their XF user interface in order to queue simulations directly to such systems. External Queue Integration (EQI) must be configured on the cluster by a system administrator before it is available for use in XF.
Each user must follow these steps to submit a job to either an external cluster or the cloud.
Map a Network Drive
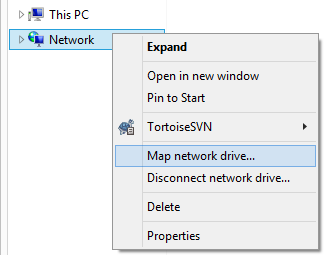
When working with Windows, users must map a network drive to the common filesystem with the compute cluster:
- Open Windows Explorer.
- Right-click on Network and select Map network drive to open the Map Network Drive window.
- Select the Drive from the drop-down menu.
- Choose a Folder from the drop-down menu or use the Browse button to find a selection.
- Click Finish to apply the changes and close the window.
Microsoft's documentation includes instructions for each available version of Windows.
When working with Linux, users should contact their network administrator for assistance.
Set the Application Preferences

EQI is enabled by default, but other adjustments can be made through XF's application preferences if desired. Access the application preferences by clicking Edit in the upper-left corner of the XF window and selecting Application Preferences.
Under the Simulation tab, make the desired changes using the following options:
- Priority: ranks the simulation as either Low, Normal, or High relative to all other jobs running on the HPC system. This option is used for external queues only, and the selection is ignored unless the setting is implemented by the system administrator.
- Use XStream Acceleration: when checked, runs the simulation using a graphics processing unit (GPU).
- Number of Devices to use: specifies the number of XStream devices to use with XStream Acceleration. Auto determines the number of devices automatically based on the simulation's requirements.
- Use MPI: when checked, runs the simulation across multiple machines using the message passing interface (MPI) when needed.
- Number of Ranks to Use: specifies the number of nodes to use with the MPI. Auto determines the number of ranks automatically based on the simulation's requirements.
- Extra Queue Options: customizes the control system's submission command by adding the specified text.
- Extra Solver Options: customizes XF's calculation engine command by adding the specified text.
Submit a Simulation
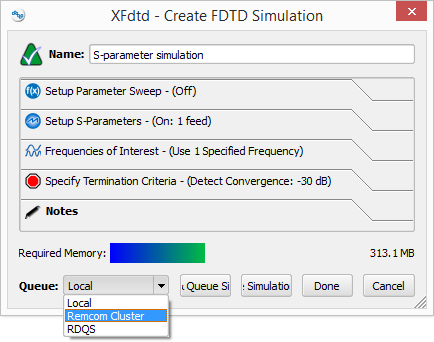
A queue is specified when a simulation is created.
- Click on the Simulations button on the right side of the XF window to open the Simulations window.
- Select FDTD from the Create Simulation drop-down menu at the top of the Simulations window.
- In the Create FDTD Simulation window, select the desired Queue from the drop-down menu in the lower-left corner.
- Click Done.
Then, manage simulations in the Simulations window.