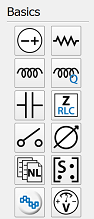
The workspace window of the schematic editor contains components and transmission lines for use when adding schematic elements to a project. Once a component is added to a schematic, its properties can be edited by either double-clicking on the component, or by right-clicking on it and selecting Edit Properties.
Each component property editor includes element-specific settings, as well as the following general options:
- Name: user-defined component identifier.
- Label Position: placement of a component's label.
: determines which information is visible in a component's label.
- Enabled State: sets a component as either active or inactive. Inactive components are either open or short.
Voltage Source

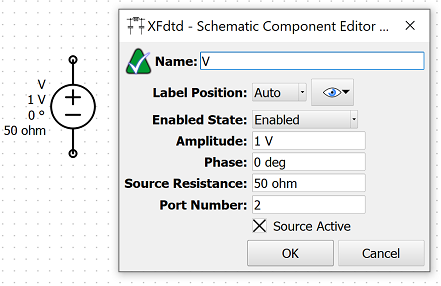
The button adds an independent AC voltage source to the current schematic.
The following settings define its parameters:
- Amplitude: the AC amplitude of the voltage source. When set to zero, the voltage source acts as a passive resistor with resistance equal to the source resistance.
- Phase: the AC phase of the voltage source.
- Source Resistance: the source resistance of the voltage source. For S-parameter analysis, this value is also used as the port's characteristic impedance. The source resistance must be greater than zero.
Users should note that the frequency of the AC voltage source is set equal to the current sample frequency of the frequency sweep, such that the same amplitude and phase are applied at all frequencies, meaning the source is not frequency dependent. Each voltage source is automatically treated as a port when calculating S-parameters.
Resistor

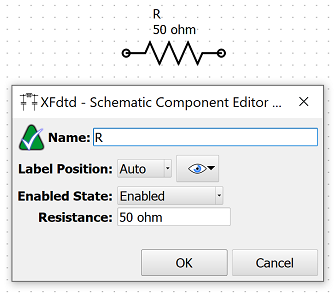
The button adds an ideal resistor to the current schematic.
The Resistance parameter is the resistance of the ideal resistor, and must be greater than or equal to zero. When set to zero, a minimal resistance is used by the solver.
Inductor

The button adds an inductor with a frequency dependent quality factor to the current schematic.
The following settings define its parameters:
- Inductance: the inductance of the inductor. The inductance must be greater than zero.
- Q at Frequency: the quality factor of the inductor at the frequency defined by Q Frequency. Q must be greater than zero.
- Q Frequency: the frequency at which the quality factor is defined. The Q frequency must be greater than zero.
Users should note that if the quality factor is infinite (inf), then the inductor is equivalent to an ideal lossless inductor. If the quality factor is finite, then the inductor is modeled as an ideal inductor in series with an ideal resistor with resistance equal to $R = \omega L/Q = 2 \pi fL/Q$, where $f = Q_{Frequency}$.
Inductor with Constant Q

The button adds an inductor with a frequency independent quality factor to the current schematic.
The following settings define its parameters:
- Inductance: the inductance of the inductor. The inductance must be greater than zero.
- Q: the quality factor of the inductor. Q must be greater than zero.
Users should note that if the quality factor is infinite (inf), then the inductor is equivalent to an ideal lossless inductor. If the quality factor is finite, then the inductor is modeled as an ideal inductor in series with an ideal resistor with resistance equal to $R = \omega L/Q = 2 \pi fL/Q$, where $f$ equals the current frequency sample of the frequency sweep.
Capacitor

The button adds a capacitor with an equivalent series resistance (ESR) to the current schematic.
The following settings define its parameters:
- Capacitance: the capacitance of the capacitor. The capacitance must be greater than zero.
- ESR: the equivalent series resistance of the capacitor. The ESR must be greater than or equal to zero.
If the ESR is equal to zero, then the capacitor is equivalent to an ideal lossless capacitor. If the ESR is greater than zero, then the capacitor is modeled as an ideal capacitor in series with an ideal resistor with resistance equal to ESR.
Ideal Transmission Lines

The button adds a four-terminal ideal transmission line to the current schematic.
The button adds a two-terminal ideal transmission line to the current schematic.
The ideal transmission line can be defined by its admittance parameters as
\begin{equation} Y_{11} = Y_{22} = \frac {1} {jZ_0 \tan (\beta l_p)} \end{equation} \begin{equation} Y_{12} = Y_{21} = \frac {j} {Z_0 \sin (\beta l_p)} \end{equation}where $Z_0$ is the characteristic impedance, $\beta$ is the phase constant, and $l_p$ is the physical length of the line. The physical line length is calculated from the electrical length according to
\begin{equation} l_p = \frac {l_e} {360} \lambda = \frac {l_e} {360} \frac {c} {2 \pi f} \end{equation}where $l_e$ is the electrical length in degrees, $c$ is the speed of light in a vacuum, and $f$ is the transmission line's evaluation frequency in Hz.
The following settings define their parameters:
- Electrical Length: the electrical length, or phase length, defines the amount of phase shift an electromagnetic wave incurs while traveling over the length of the transmission line at a given frequency. The electrical length must be greater than zero.
- Characteristic Impedance: the characteristic impedance of the transmission line. The characteristic impedance must be greater than zero.
- Evaluation Frequency: the frequency at which the electrical length is defined. The evaluation frequency must be greater than zero.

Users should note that the two terminal ideal transmission line assumes that the reference terminal of both the input and output ports is connected to global ground resulting in the relationship shown in the image.
Netlist

The button adds an N-port subcircuit defined by a SPICE3 format netlist file to the current schematic.
The Terminal Pattern determines the port-number order shown in the schematic's netlist block when there are three or more ports. Mousing over the port number in the schematic displays a tool tip with the port's name as specified in the netlist file.
The Subcircuit parameter specifies the .SUBCKT definition to include from the netlist file. Users can find additional information about file format and supported component types on the netlist component page of Remcom's support site.
SnP Block

The button adds an N-port device defined by S-parameters imported from an *.SnP or MDIF file to the current schematic.
The Terminal Pattern determines the port-number order shown in the schematic's SnP block when there are three or more ports.
When multiple *.SnP files are imported into the SnP block, the Active Data setting specifies which *.SnP file is evaluated by the circuit solver.
Users should note that the range of the circuit simulation's frequency sweep is limited according to the frequency range of the SnP block's data.
FDTD Block

The button adds an N-port device defined by S-parameters obtained from an FDTD simulation to the current schematic.
The Terminal Pattern determines the port-number order shown in the schematic's FDTD block when there are three or more ports. Mousing over the port number in the schematic displays a tool tip with the port's name as specified in the FDTD simulation.
When multiple FDTD simulations are specified in the FDTD block, the Active Data setting determines which simulation is evaluated by the circuit solver.
Users should note that the range of the circuit simulation's frequency sweep is limited according to the frequency range of the FDTD block's data.
Switch

The button adds an ideal switch to the current schematic.
The Switch State parameter specifies whether the switch is open or closed. In the Open state, the switch functions as an ideal open circuit. In the Closed state, the switch functions as an ideal short circuit.
Phase Shifter

The button adds an ideal phase shifter to the current schematic. The phase shifter is defined by its S-parameters as
where $\theta$ is the phase shift in radians.
The following settings define its parameters:
- Phase Shift: the phase shift applied by the phase shifter.
- Reference Impedance: the characteristic impedance of both the input and output ports.
Users should note that both the input and output ports are referenced to global ground.
Voltmeters

The button adds a two-terminal voltmeter to the current schematic, which saves voltage versus frequency data according to $V(f) = V_+(f)-V_-(f)$.
The button adds a one-terminal voltmeter to the current schematic, which saves voltage versus frequency data at the connected node referenced to global ground.

Users should note that placing a two-terminal voltmeter in series with other circuit components results in an open circuit, and is therefore not recommended. A one terminal voltmeter is equivalent to a two terminal voltmeter referenced to ground.
Ammeter

The button adds an ammeter used to record branch current versus frequency data.
The Resistance parameter specifies the internal resistance of the ammeter, and must be greater than or equal to zero. When set to zero, a minimal resistance is used by the solver.
Users should note that placing an ammeter in parallel with other circuit components results in a short circuit.